I actually found this recipe printed on the back of a box of Cornflakes cereal. It looked pretty interesting and easy to make, so I decided to try it out. Firstly, you would need to cook some pasta. The recipe called for egg noodles but I used some tri colored rotini. I guess it doesn't matter what kind of noodle/pasta you use. Just cook the pasta until al dente, then set it aside.

Next, melt some butter in a pan and throw in some sliced button mushrooms.

Once the mushrooms are semi cooked, add in some chopped ham.

Mix the ham and mushrooms together and allow it to cook for a bit. Once that's done, add in a can of condensed cheddar cheese soup and about 3/4 cups of milk. Crack in some black pepper as well as some onion and garlic powder. Combine it all together.

Add in the pasta and mix it all together well.

Transfer everything into a lightly greased baking dish.

Sprinkle some Mozzarella cheese on top of the casserole.

In a large mixing bowl, crush about 2 and a 1/2 cups of Corn flakes. Pour in about 2 tablespoons of melted butter and mix it all together.

Top the casserole with the Corn flakes mixture.
 Pop in the casserole into a 350F oven for about 30-35 minutes. You will know that it's done once the edges are bubbly.
 Allow the casserole to settle for a few minutes before serving.
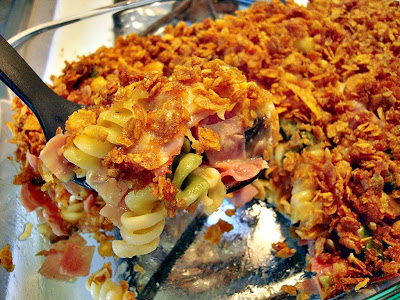 I was really surprised that it turned out to be so yummy. It's a great idea to use cornflakes instead of breadcrumbs to top the casserole. The whole apartment just smelled so good when the casserole was in the oven! This recipe is definitely a keeper. :D

 Remember my post about the Roti Canai Hot Dog Roll and Roti Canai Chicken Puff? Well today, I am going to make another really simple and quick recipe using frozen roti canai. This time around, I'm making Roti Canai Ham & Cheese Rolls.
 Start off by taking out a piece of frozen roti canai from the freezer and allowing it to thaw on the kitchen counter for about 5-10 mins. Remember not to over thaw. We just need it to be pliable. If you overthaw the frozen roti canai, it will be very sticky, thus making it really hard to work with.
 Next, brush on some egg wash onto the roti canai. If you notice, the first few steps in this recipe is exactly the same as the roti canai hot dog recipe.
 Then, place a large piece of ham (you can use two or three pieces if your ham is really small) and one stick of mozzarella string cheese onto the roti canai.
 Roll the roti canai up and tuck in the sides. Make sure that everything is nicely tucked in. If not, the cheese will ooze out when it melts. Once you have rolled it up nicely, you can then place it onto a greased baking tray. Remember to cut some slits on the top of the rolls. This is to allow steam to escape while baking.
 After cutting the slits on the top of the rolls, brush on some egg wash. The egg wash will give the rolls a nice golden brown color when it's done baking.
 Pop it in a 350F preheated oven for about 45 minutes. Once it's done, allow it to cool down for a while before serving.
 There you go! A yummy looking piece of roti canai ham and cheese roll. You can cut it to half before serving. It's just perfect for an afternoon snack or something to munch on while watching TV. Not only are they really simple to make, but they are really yummy to eat!


 Next, lay a piece of ham on one side of the chicken. If the ham doesn't fit that well, you can just cut it to shape.
  Then, sprinkle on some cheese. The original recipe calls for swiss cheese but I used some shredded mozzarella instead. It's equally as good.


 First, spread some Miracle Whip on a tortilla. Today, I used a regular tortilla but sometimes I would change it up by using Wheat, Spinach or other types of tortilla.
 Then, place a few slices of cheese on top of the Miracle Whip. I used Provolone but you can basically use any type of cheese that melts well (Swiss, Mozzarella...ect).
 Next, place a few slices of deli meat on the cheese. I used Virginia Ham but again, it's totally up to you. You can use roast beef, corned beef, turkey, roast chicken, pepperoni...it's entirely up to you.
 Place a couple more slices of cheese on top of the deli meat.
 Now it's time to roll up the tortilla. All you need to do is roll it up half way, tuck in the side and continue rolling. Then, place it on a George Foreman grill that has already been heated.
 Allow it to grill for a couple of minutes (until you can see the grill lines).
 Once it's nice and grilled, remove it from the grill and cut it into half.
 There you go! A yummy lunch all ready in less than 15 minutes! You can serve it up with some chips, a side salad or even a fruit salad. Today, I had my Grilled Ham & Cheese Wrap with a large handful of Lays Original Potato Chips and a tall glass of Coke. Mmmm mmmm mmmm =)