
I found this simple recipe at the back of a stuffing box a while ago and decided to give it a try. It looked easy enough and doesn't require much prep time. The verdict? Simply delicious! It's so yummy, we have made it a couple more times since the first time we tried it! Kevin even said that it's one of his favorite recipes todate. So, let me share this simple recipe with you.

Start off by browning some skinless chicken breast on a pan. Sprinkle some salt and freshly crushed black pepper to season the chicken.

Once it's nicely brown (it doesn't really need to cook through, this is just to give it some color), remove from pan and set aside.

Now, pour in a can of condensed cream of chicken soup into a bowl.

Then, add in about half a can of milk.

Next, add in a few dollops of sour cream.

Mix it all together. At this point, you can choose to add in some sliced mushrooms or frozen vegetables if you like.

The next thing we need to do is combine everything together. Spread about half of the soup, milk and sour cream mixture on to the bottom of a deep baking dish. Then, placed the chicken breast on top of it.

Once you have done that, sprinkle some shredded cheese over the chicken.

Take the remaining soup mixture and cover the chicken completely.

Lastly, cover the soup mixture with stuffing. To make the stuffing, just follow the cooking instructions from the instant stuffing box. It's really easy, just add 2 cups of water with the stuffing mix and pop it into the microwave oven for 4-5 minutes.

Cover the baking dish with aluminium foil and pop it in a 400F oven. After about 30 minutes or so, your Chicken & Stuffing Bake is done!! Now, wasn't that easy? I served it up with a side of herb rice and some steamed broccoli. It's really yummy and easy to make, you should try it!

 Here is another 'must have' on our holiday menu - the Classic Green Bean Casserole! You cannot go wrong with this recipe. It's really easy to make and it has become a staple in all of our holiday meals. It doesn't require many ingredients and it takes barely minutes to prep. Here's the recipe!
 Start off by mixing 1/2 a cup of milk to 1 can of condensed mushroom soup. It doesn't HAVE to be Campbell's but I don't know, it always seem to taste better whenever I use Campbell's Cream of Mushroom Soup.
 Then, add in a few splashes of Worcestershire sauce and some black pepper. I like how the Worcestershire sauce adds in a little kick to the entire dish.
 Next, add in 4 cups of frozen cut green beans into a baking dish. Then, stir in the mushroom soup mixture. At this point, you can choose to stir in some fried onions if you like. I really love fried onions, so I would usually stir in some. Cover the baking dish with aluminum foil and pop it into a 350F oven for about 25 minutes.
 After about 25 minutes (or once it starts bubbling), remove the baking dish from the oven and sprinkle on some fried onions. Pop it back into the oven (without the aluminum foil) for about 10 minutes. The green bean casserole is ready to be served once the fried onions are nicely browned. There you go, another super simple holiday favorite!


 Next, melt some butter in a pan and throw in some sliced button mushrooms.
 Once the mushrooms are semi cooked, add in some chopped ham.


 Pop in the casserole into a 350F oven for about 30-35 minutes. You will know that it's done once the edges are bubbly.
 Allow the casserole to settle for a few minutes before serving.
 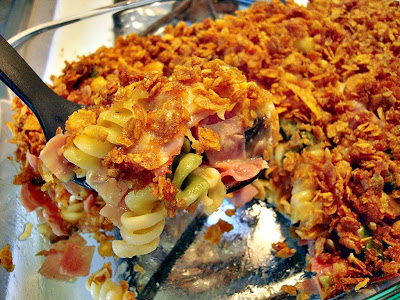 I was really surprised that it turned out to be so yummy. It's a great idea to use cornflakes instead of breadcrumbs to top the casserole. The whole apartment just smelled so good when the casserole was in the oven! This recipe is definitely a keeper. :D