
Since I posted my
Roti Canai Hot Dog Rolls recipe back in April, many people have commented that that they really liked the recipe and that it was very simple to make =) Based on that recipe, I came up with another frozen Roti Canai recipe. This time, I'm gonna make some Roti Canai Chicken Puff.

It's also really simple to make and yummy to eat. First, we need to make the filling. You can use some leftover roast chicken or you can boil/steam some chicken breast or thighs. Then, shred it up to tiny pieces.

Add in a few dollops of mayo and mix it with the chicken. Crack in some black pepper and you can add in some parsley and thyme, if you like.

Next, add in some raisins. If you do not like raisin, you can even add in some chopped apples or just leave out this step completely. It's up to you. Mix everything together and set it aside.
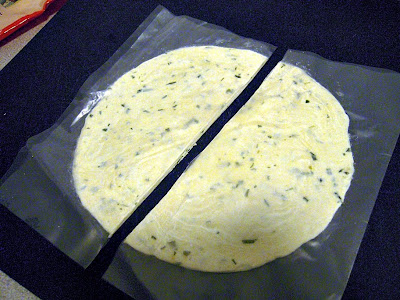
Remove the frozen roti canai from the freezer and allow it to thaw for a few minutes. Remember, do not over thaw. The dough will become too sticky and really hard to work with if you over thaw. Cut the roti canai to half.

Pull off the top plastic layer from the roti and brush on some egg wash.

Put the chicken filling on one side of the roti (just like the picture).

Flip over the dough to cover the chicken. Remove the bottom plastic layer and place the chicken puff on a greased baking sheet. Using a fork, seal the sides of the puff.

Brush some more egg wash on top of each puff. This is to give it a nice golden brown color when it's done.

Pop the chicken puffs into a 350F oven for about 35 minutes or until it turns golden brown.

There you go, it's done! Wasn't that easy? Allow it to cool for about 5 minutes before serving. You should try it, it's really good! =)

 Remember my post about the Roti Canai Hot Dog Roll and Roti Canai Chicken Puff? Well today, I am going to make another really simple and quick recipe using frozen roti canai. This time around, I'm making Roti Canai Ham & Cheese Rolls.
 Start off by taking out a piece of frozen roti canai from the freezer and allowing it to thaw on the kitchen counter for about 5-10 mins. Remember not to over thaw. We just need it to be pliable. If you overthaw the frozen roti canai, it will be very sticky, thus making it really hard to work with.
 Next, brush on some egg wash onto the roti canai. If you notice, the first few steps in this recipe is exactly the same as the roti canai hot dog recipe.
 Then, place a large piece of ham (you can use two or three pieces if your ham is really small) and one stick of mozzarella string cheese onto the roti canai.
 Roll the roti canai up and tuck in the sides. Make sure that everything is nicely tucked in. If not, the cheese will ooze out when it melts. Once you have rolled it up nicely, you can then place it onto a greased baking tray. Remember to cut some slits on the top of the rolls. This is to allow steam to escape while baking.
 After cutting the slits on the top of the rolls, brush on some egg wash. The egg wash will give the rolls a nice golden brown color when it's done baking.
 Pop it in a 350F preheated oven for about 45 minutes. Once it's done, allow it to cool down for a while before serving.
 There you go! A yummy looking piece of roti canai ham and cheese roll. You can cut it to half before serving. It's just perfect for an afternoon snack or something to munch on while watching TV. Not only are they really simple to make, but they are really yummy to eat!


